Shoulder Replacement Surgery:
What You Need to Know
Shoulder Replacement Surgery:
What You Need to Know
Shoulder Anatomy Overview
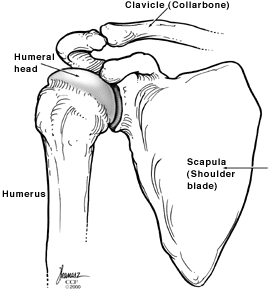
The shoulder is a ball and socket joint that enables you to raise, rotate, twist, and move your arm in almost every direction. The head of the upper arm (humerus) is the ball and an oval depression called the glenoid on the shoulder blade (scapula) is the socket.
A soft tissue rim (the labrum) surrounds and effectively deepens the glenoid. The head of the humerus and the glenoid are both covered with a smooth, durable, frictionless tissue (articular cartilage); the joint is encapsulated by a smooth, thin inner layer of lining call the synovium.
Together the synovium and articular cartilage allow for the effortless and smooth motion of the shoulder joint. The surrounding rotator cuff muscles and ligaments provide strength, power, and stability.

Arthritic Shoulder Joint
The term “arthritis” is the medical term used to when there is abnormal or absent cartilage in a joint.
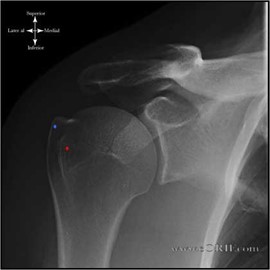
An X-ray of an arthritis shoulder shows bone spurs, whitening of the bone (sclerosis) and a decreased joint space between the humeral head and the glenoid. This narrowed joint space represents a loss of bone cartilage, which can progress to “bone-on-bone” arthritis.
As the condition advances people notice pain, loss of motion and weakness.

Shoulder Arthroplasty
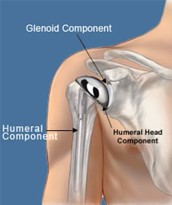
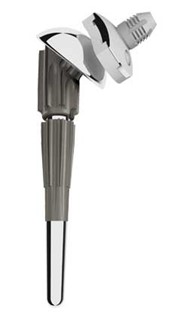 Shoulder replacement surgery replaces the damaged joint surfaces with artificial parts (prosthesis). Usually, there are two components: The humeral component replaces the head of the humerus. It is made of metal (usually a cobalt-chrome based alloy) and has a rounded ball attached to a stem that fits into the humerus. This component comes in various sizes to accurately replicate the patient’s anatomy
The glenoid component replaces the socket. It is generally made of a metal component (base-plate) and has an ultrahigh density polyethylene liner. Depending on the damage to your shoulder, your doctor may replace just the humeral head (hemiarthroplasty) or both the humeral head and the glenoid (total shoulder arthroplasty). The components come in various sizes and shapes and are held in place with either acrylic bone cement (cemented) or bone ingrowth (cementless). As in the natural joint, the surrounding muscles and tendons provide stability for the prosthesis.
Surgery requires that one of the muscles of the rotator cuff is moved to get down to the joint. Instead of disrupting the tendon, which cannot heal well, a piece of bone is removed where the rotator cuff muscle attaches. This is repaired at the end of surgery once the prosthesis is in place. You will be restricted in certain activities while this heals.
Reverse Shoulder Arthroplasty
Reverse Total Shoulder Arthroplasty (rTSA) is designed specifically for the treatment of glenohumeral arthritis when it is associated with irreparable rotator cuff damage, complex fractures not amenable to hemi-arthroplasty or fixation, as well as for previously failed conventional Total Shoulder Arthroplasty in which the rotator cuff has become deficient. Its use in the United States has been FDA approved since 2004.
The rotator cuff is generally absent or minimally involved in the function of an Reverse TSA. The bulk of the stress to provide motion and strength of the shoulder is placed upon the deltoid and surrounding peri-scapular muscles. Therefore, the rehabilitation for a rTSA patient is different than for a patient after a traditional TSA. If the subscapularis is intact, it is always be reconstructed at the end of the case to promote stability of the prosthesis. It is not necessary to reconstruct or repair the subscapularis tendon for good functional recovery of the shoulder after rTSA.
In the event the external rotators of the shoulder are deficient in a rotator cuff deficient shoulder, a latissimus dorsi transfer is often performed in conjunction with the the rTSA to give the patient the ability to externally rotate. This muscle transfer enhances the shoulder’s ability to externally rotate the arm so that the patient can reach the back of the head for activities of daily living.
When a reverse total shoulder arthroplasty is performed for a shoulder fracture, the tuberosities (bony attachments of the rotator cuff) are always repaired to promote stability of the prosthesis and to improve after surgery function.
Reverse Total Shoulder Arthroplasty Biomechanics
The rTSA prosthesis reverses the orientation of the shoulder joint by replacing the glenoid fossa with a glenoid base plate and glenosphere and the humeral head with a shaft and concave cup. This prosthesis design alters the center of rotation of the shoulder joint by moving it medially and inferiorly. This subsequently increases the deltoid moment arm and deltoid tension, which enhances both the torque produced by the deltoid as well as the line of pull / action of the deltoid.
This enhanced mechanical advantage of the deltoid compensates for the deficient rotator cuff as the deltoid becomes the primary elevator of the shoulder joint. This results in an improvement of shoulder elevation. Individuals are able to raise their upper extremity overhead with strength and confidence.
Important rehabilitation management concepts to consider for a post-operative physical therapy rTSA program are:
- Joint protection: Historically, there has been a reported higher risk of shoulder dislocation following rTSA than a conventional TSA. Over the last decade, this risk is comparable to traditional anatomic replacements.
- Avoidance of shoulder extension past neutral and the combination of shoulder adduction and internal rotation should be avoided for 6 weeks post-operatively.
- Patients with rTSA don’t dislocate with the arm in abduction and external rotation. They typically dislocate with the arm in internal rotation and adduction in conjunction with extension. As such, tucking in a shirt or performing bathroom / personal hygiene with the operative arm is a particularly dangerous activity in the immediate per-operative phase. As the muscles regain their tone and strength, such motions become less dangerous and more possible.
- Deltoid function: Stability and mobility of the shoulder joint is now dependent upon the deltoid and periscapular musculature. This concept becomes the foundation for the postoperative physical therapy management for a patient that has undergone rTSA.
- External rotation: The ability to externally rotate the arm is dependent upon the posterior rotator cuff muscles. If these muscles are deficient, a latissimus muscle transfer is important to restore this function. Without external rotation ability, a patient with a reverse shoulder arthroplasty will suffer from what is known as a “hornblower’s sign.” This phenomenon is when the patient is unable to rotate the arm to touch the hand to the back of the head due to lack of external rotation.
- Function: As with conventional TSA, the goal is to maximize overall upper extremity function, while respecting soft tissue constraints.
- ROM: Expectations for range of motion gains should be set on case-by-case basis depending upon underlying pathology. Normal or full active range of motion of the shoulder joint following rTSA is the goal but not always the reality. One has to remember that a reverse total shoulder joint is not a normal shoulder joint.
Total Shoulder Arthroplasty: What to Expect
Congratulations! You have chosen to get a shoulder replacement. Now you are on the road to increasing your quality of life and living a healthier active lifestyle. You’ve chosen to get back your life!
Pre-Operative:
Based on your medical conditions, you may need to get clearances to have anesthesia by your medical doctor, cardiologist, pulmonologist, and/or any other pertinent doctors who play a critical role in your health care.
Blood work, chest X-rays and an EKG will be ordered as baseline medical studies. All this is to ensure that you are safe to undergo the anesthesia needed for the procedure. It is our primary responsibility to make sure that you will have a successful surgical experience.
Outpatient surgery versus Overnight stay versus Admission to the Hospital:
More and more, both anatomic and reverse total shoulders are being done as an outpatient surgery. With the advances in pain management via nerve blocks, improved techniques in surgery, increased efficiencies in performing the surgery, and improved prosthetic designs outpatient shoulder replacement surgery has become an acceptable standard of care.
Many factors determine a patient’s candidacy for outpatient surgery:
- Health and medical co-morbidities
- Home support after surgery
- Insurance Approval
Patients who do not qualify for outpatient shoulder replacement surgery often are able to undergo the procedure as an overnight stay operation.
Patients who require a short rehabilitation stay after surgery will generally require admission to the hospital for anywhere from 48 to 72 hours.
Day of Surgery:
You will arrive to the hospital at least 1-2 hours ahead of your procedure to make sure you and your surgical team are ready for surgery. There is a probability that we will be running ahead of schedule for the day….so we want to make sure you have a smooth, efficient, and great surgery experience!
After you get taken back to the pre-operative area you will change into a gown and your belongings will go in a bag to be locked in a locker when you go to the operating room. An IV will be started and the nurses will ask you several questions about your medical history. This process may seem redundant and that is because it is! From start to finish, the primary directive of all the staff is your safety.
You will have a few of visitors while you are in pre-op:
Anesthesia – An anesthesiologist will be in to talk to you about anesthesia for the surgery. They will go over the type of anesthesia and the side effects.
For this procedure you will get General anesthesia. Most likely a mouthpiece called an LMA will be inserted to keep your airway open. They may have to intubate you as well depending on the circumstances. You cannot be awake for the procedure because of the position we have to put you in to do the operation as well as the fact that we are working very closely to her neck and head, where there are a lot of important structures. This is for your safety throughout the procedure.
The anesthesiologist will also talk to you about something called a nerve block. This is local anesthetic that is injected in the space around the nerves in your neck. This will make your entire arm numb for anywhere from 12-18 hours after the procedure. If you are lucky, the nerve block will last much longer – anywhere from 18-24 hours. The nerve block helps reduce post-operative pain. It also allows the anesthesia provider to reduce the amount of general anesthesia you will require. Their ability to do this makes the surgery much safer for you. You will experience less of the side effects that accompany general anesthesia if the does you receive is lower.
Dr. Nanavati – He will be by prior to the procedure to go over everything again and to make sure he will be doing the correct procedure that you both have decided on. He will sign the operative side so there are no mistakes when you get to the operating room. He will also get you to sign a consent form. This is a document that says you consent to do the procedure. He will reviews the potential risks of the procedure as well and those will be written on the form. He will spend time to answer any last questions you or your family member may have that were not addressed during the pre-operative visit.
OR Nurse – This is the nurse that is in the operating room. She or he will talk to you about your medical history again and go over everything that will happen to keep you safe in the operating room. They will accompany the anesthesia provider when taking you to the operating room.
Operation:
You will be awake when you enter the operating room. You will be instructed to get onto the operating table. After you are made comfortable, you will be given a light sedation to help you relax. The anesthesiologist will then put you to sleep for the procedure.
Our team understands the trust have put in us to perform this operation. Our team will take good care of you J
Post-Operative:
After the surgery is complete you will be taken to the recovery room, also known as the PACU. This is where you will wake up from the anesthesia and we make sure you are doing ok. You will be in a sling that will be wrapped around your body so you can’t move your shoulder. After you are awake, the recovery nurses will let your family come and visit you.
Once you are deemed to be stable medically you will be transferred to the orthopedic floor if you are having this procedure in the hospital and require an overnight stay. There you will stay in your private room until you are ready for discharge.
If you undergo an outpatient shoulder replacement surgery, your after-surgery instructions will be reviewed with you and your family and then you will be discharged home. You will have been given pain medications prescriptions that will be ready to be picked up at your local pharmacy.
Dr. Nanavati will see you in the recovery room, but you won’t remember much of that conversation. You will be in a happy place from the meds the anesthesia provider had given you. Dr. Nanavati will have spoken with your family to let them know how things went. He will see you during your hospital stay if you have been admitted after surgery. If you had your surgery performed as an outpatient procedure, his team will call you the following day to check on you. At your post-surgery visit, Dr. Nanavati will discuss the details of surgery and recovery with you.
If you have an overnight stay, many providers will be visiting you the following day: Nurses, Techs, Case Manager, Physical Therapists, Occupational Therapists, Physician Assistants and Doctors.
All of us have one mission in mind: to help you have a speedy and successful recovery!
You may get your blood drawn the morning after surgery so we can check your electrolytes and blood count to make sure you are still recovering well from the procedure.
Someone will be in the room to get you out of the sling and teach you exercises to do. You will be taught to move your elbow and wrist so these joints don’t get stiff. You will also be taught some simple things to do to start moving your shoulder.
You will be getting pain medication the entire time you are in the hospital. Once the block wears off, you will experience more pain. The nurses will monitor your pain and help you stay ahead of the pain curve. Signs of the block wearing off are numbness and tingling in your fingers as well as movement and sensation in your fingers.
You will be discharged from the hospital or surgery center when you are medically stable per protocols. For some people, it is the next day after surgery. Others may need an extra day. If you have had an outpatient surgery, we will be able to keep you overnight should the unlikely need arise. We will never push you out before you are ready to go!
Some people will go home afterwards, and some people will go to a rehab center. This is case dependent, everyone is different.
Pain after surgery – what to expect:
With the nerve block, you should experience prolonged pain relief for several hours. Ideally, the nerve block will last anywhere from 12-18 hours. During that time, your arm will be numb and pain free. It is an unusual feeling not to be able to move your arm or feel your fingers. These symptoms will pass and you will recover sensation and motion. The longer the nerve block lasts, the more pain relief you will feel and the less you will require additional pain medications. When the nerve block wears off, there will be a sharp increase in your pain. This can be unnerving to experience at first. Your pain medications will seem as though they do not effectively control your pain. Within the first 24 hours of experiencing pain, you will begin to notice that the cumulative effects of the pain medications will start to moderate your pain. Do not expect to be pain free. Pain medications do not make you pain free. They only moderate your pain to a tolerable level. As pain is an individual experience, we may need to make adjustments to your medications to effectively control your pain. These adjustments have to be made with the potential negative side effects of respiratory depression and overdose potential in mind. Therefore, the process of adjusting your medications may take some time as your safety is our priority.
At Home:
You will be sent home with instructions on medications, dressing changes and exercises.
In addition to your home medications you will be given pain medicine, aspirin and a stool softener.
The most common side effect of narcotic medicine is constipation so we try and give you a stool softener to help get things moving.
Anticoagulation: After a joint replacement you are at risk for developing a blood clot in your legs. This can lead to devastating consequences so we do what we can to prevent it.
You will be on Aspirin for 2-4 weeks after surgery. This thins your blood to prevent it from sticking together. You also need to get up and walk around as often as possible when you are at home to prevent the blood from pooling in your legs. Walking stimulates your muscles to promote the veins to make your blood flow. Flowing blood cannot form blood clots.
If you have a history of blood clots, you may require stronger anti-coagulation medications such as Lovenox (an injectable medication), or strong oral anti-coagulant. Generally, this decision will have been made after consultation from your medical doctors.
You will need to do the shoulder exercises at least 4-5 times per day. This helps to prevent your shoulder from getting stiff after surgery. The most important thing to remember at this point is not to move your arm yourself. Use your opposite arm to move and do the exercises. This is called PASSIVE motion.
Exercises
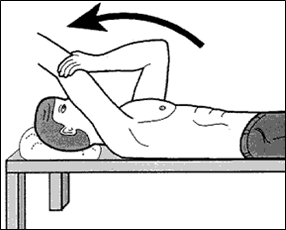
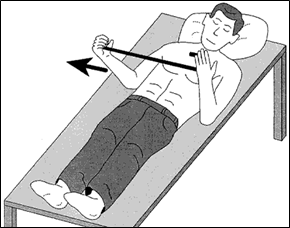
5 times each day you should perform assisted overhead reaching and external rotation (outward turning) exercises with the operative arm. You were taught these exercises prior to discharge by the doctor and therapist. Both exercises should be done with the non-operative arm used as the “therapist arm” while the operative arm remains relaxed. 10 Repetitions of each exercise should be done 5 times each day.
Overhead reach is helping to lift your stiff arm up as high as it will go. To stretch your overhead reach, lie flat on your back, relax, and grasp the wrist of the tight shoulder with your opposite hand. Using the power in your opposite arm, bring the stiff arm up as far as it is comfortable. Start holding it for ten seconds and then work up to where you can hold it for a count of 30. Breathe slowly and deeply while the arm is moved. Repeat this stretch ten times, trying to help the arm up a little higher each time.
External rotation is turning the arm out to the side while your elbow stays close to your body. External rotation is best stretched while you are lying on your back. Hold a cane, yardstick, broom handle, or dowel in both hands. Bend both elbows to a right angle. Use steady, gentle force from your normal arm to rotate the hand of the stiff shoulder out away from your body. Continue the rotation as far as it will go comfortably, holding it there for a count of 10. Repeat this exercise ten times.
Follow-Up:
2 Week Appointment:
You will follow-up with Dr. Nanavati 10-14 days after your surgery. At that time we will take an Xray, remove your stitches or staples and go over the surgery. We will give you a prescription for physical therapy and go over restrictions at that time.
You should keep your elbow at your side initially and only do things close to your body. You may drive as long as you are off the narcotic medications. You may type, wash your face, etc. Anything that is close to your body and doesn’t require heavy weight you may do. You may NOT do any heavy lifting, pushing, pulling. No sudden movements. No jerking or letting anyone yank and tug on your arm. Be nice and gentle.
You will need to be in a sling for around 6 weeks after surgery. You will come out of it to do your exercises. The physical therapist will go over these exercises with you. The prescription that we will give you can be used anywhere. You can look prior to your appointment for a place near your house that is easy to get to if you would like. We also have a list of offices in the area in case you are having trouble. You may come out of the sling if you are sitting at home and there is no threat of a small child or animal that could tug on your arm.
6 Week Appointment:
At this appointment your sling will go away! You should be able to get your arm to your forehead at this stage. Now you can start moving your arm away from your body and becoming more functional. This will start the next phase of physical therapy. You will get another prescription at this visit. They will start getting all your range of motion back and conditioning your muscles to make them stronger.
12 Week Appointment:
Hopefully at this point you will be feeling much better and will have great range of motion. We will get another Xray at this visit to verify that everything looks ok. You may still feel a little bit weak, which is normal. It can take 5-6 months for people to completely recover. You will get another prescription for physical therapy. This phase is all about strengthening your muscles and getting your shoulder to be a normal, functional arm.
6 Month Appointment:
At this time we get another Xray and check to make sure you are doing ok.
After this we will see you yearly for an Xray and a check –up.
To remember:
You will need to take antibiotics prior to any minor or dental appointment (cleaning, cavities, root canals, etc.). Though the American Dental Association and the American Academy of Orthopedic Surgery recommend pre-procedure antibiotics for 1 year, we recommend that you consider taking the pre-procedure antibiotics forever to reduce the risk of infection.
Frequently Asked Shoulder Replacement Questions:
When can I go back to work?
This depends on what you do for work. If you have a desk job that requires little or no use of the operative arm, then you can go back when you feel ready. This could be as soon as 2 weeks after surgery. We generally recommend not going back to work until after your first post-surgery visit. If you have a high impact job, then you need to discuss this with your surgeon before returning to work.
When can I drive?
You usually can drive after we see you back for your first postoperative appointment. You will use the non-operative arm to steer the wheels, and the operative arm is for support in your lap. You may drive so long as you are not on the narcotic pain medicines. If you are taking narcotics, then you should refrain from driving as it can impair your reaction time and cause sedation behind the wheel.
When does therapy start?
Basic simple exercises will start the day after your surgery. Formal physical therapy will start after your first post-operative appointment. You will continue therapy for anywhere from 6-12 weeks.
When can I start using my operative arm?
You can use your arm for light tasks such as eating, dressing, and writing as soon as you feel comfortable. For the first 6 weeks after surgery, you will need to limit the amount of weight you lift with the operative arm to no more than a cup of coffee to one pound of weight.
What activities can I do? What can I not do?
Technically, once you are cleared for full use, there are no restrictions in using your shoulder. Our patients have gone back to recreational sports such as tennis, cycling, kayaking, light weightlifting, yoga, pilates, and skiing/snowboarding.
We do not recommend heavy weightlifting such as body building, high intensity exercises such as Crossfit, hight intensity sports such as rock climbing or advanced level mountain biking, and contact sports such as football or hockey. We encourage you to exercise regularly to keep your shoulder muscles, core muscles, and back muscles strong and healthy. This will support your shoulder.
The reason to have a shoulder replacement was to get you back to life. At the same time, we want your shoulder replacement to last for as long as possible. Some reason and common sense will take you a long way towards a healthy and happy replaced shoulder.
How long does the replacement last?
An estimation of how long the shoulder replacements last changes every 5-7 years. Surgeons do not like to make “blue sky” estimations. We tend to report on a conservative timeline. Most surgeons currently believe that shoulder replacements last anywhere from 15 to 20 years when cared for.
